Trumpet exercises

Warm Up and Daily Exercises, Breathing, Routines and Techniques, Starting the
buzz, Warmup exercise, The Stevens Isometric Exercises
Warm Up and Daily Exercises
1. Start with good sound
2. Maintenance phase
3. Play music. “Buy low – sell high”
Some important notes:
– Warm up the most important you can do. Always – mental also. Music becomes
important.
– Physical.
– Challenge.
– Making sound.
– 90% of trumpet players think physical. Don’t do that!
– Being relaxed – letting the air flow. Even if not technical good you can play
beautiful phrases.
– The audience (the non-trumpet players) want’s to feel something.
– Good big sound – “aggressive” from the start on the mouthpiece.
– It’s not an easy instrument – you hear mistakes.
– Being aggressive means beginning with the breath.
Try this:
Blow lot of air through the mouthpiece, then put mouthpiece into horn – nice
sound.
Big enemy:
Tension in the body.
Low degree of tension is the goal. Doing away with physical tensions.
Lip slurs not good for warm up. Use it later in practice.
Breathing exercises:
A
Count: one – two – three – breathe in (on four) – breathe out.
B.
one – two – three – breathe in – hold a little – breathe out.
C.
one – two – three – breathe in – add more air, add more – breathe out.
The Warm Up:
The whole group participated. We used the warm up routines from his books.
On the mouthpiece
Glissando from middle G up to G above staff, then down to pedal G. Crescendo
on the last note.

On the instrument
Repeated C’s tenuto then staccato. Continue down to low F sharp.
![]()
Smooth tones
In his book it is called “Long Tone Exercises”.
Playing C – E – C, then C – E – G – E – C, etc. Going down all the seven valve-combinations.
Technical Studies
-First Study
Start by re-numbering the lines of this study as follows: line 13=1, line 14=2,
line 12=3, line 15=4, etc. Example: (line 1 (13))
Play legato

The additional portion (bar 2, the repeated c – b) is only played first time.
By practising like this you will learn to “place” and “centre”
your notes correctly, and to improve the fluency, flexibility and intonation
of your playing.
-Second Study
First choose an easy key in order to familiarise yourself with the simplified
musical line.
For example (exercise 37)
Play legato

Then repeat the original line. On the third repeat, play double speed.
By practising like this you will learn to “place” and “centre”
your notes correctly, and to improve the fluency, flexibility and intonation
of your playing.
– Third Study
For example (exercise 57)
Play legato


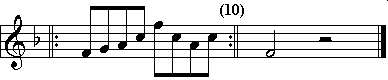
Repeat the last part 10 times.
By practising like this you will learn to “place” and “centre”
your notes correctly, and to improve the fluency, flexibility and intonation
of your playing.
Breathing
Reinhold Friedrich felt that it was very good to start the practice session
with some good breathing exercises.

1. “The Fish”
Start by expelling all air (see picture above) and bend a little forward.
Inhale with open throat.
Breath out – but only 2/3 of all air.
Then fill up.
Again breathe out 2/3.
Repeat until completely full. The cycles will be shorter and shorter
Hold for 4 count
Then breathe out all air.
A variation of this exercise was to take the arm out from the body and lift
them
above the head while repeating doing the intake cycle.
When you are completely filled up, the arms will have reached it positon above
the head.
2. Timed breathing
Inhale with open throat.
Breathe out – counting to 10.
Inhale
Breathe out – counting to 9.
Inhale
Breathe out – counting to 8.
..etc.
When reaching 1 count you really have to expell the air fast.
3. “Heech — ooh”
Inhale with open throat.
Breathe out – counting to 10, but use the tongue arch and let it start high
(Heech) and
then gradually lower the tongue to OOH when reaching count 10.
Repeat as in Ex. 2 by counting down for each round.
When reaching 1 count you really have to expell the air fast,
with an uninterrupted “HEECH-OOOH” sound.
4. Timed breathing through the mouthpipe.

Inhale with open throat.
Breathe out through the mouthpipe (without mouthpiece) – counting to 10.
Inhale
Breathe out through the mouthpipe – counting to 9.
Inhale
Breathe out through the mouthpipe – counting to 8.
etc.
James L. Klages: Routines and Techniques
Little here is original with me. The sequence and structure are mine. I do
not advocate anything other than what is said by competent trumpet teachers.
Supplement this with materials from Arban and other standard works. Create and
discover your own routines which teach you what you need. Technique is never
an end in itself- it is just a series of tools which you have to produce the
music which you want to play- with efficiency and consistency.
The
whole exercise in PDF-format. (35 pages – Use Acrobat Reader 3.x or higher)
1. Always be careful to use good full tone. Make the room “ring”
with your sound.
2. Rest as much as you play.
3. You don’t have to play everything here every day, but touch on the
skills used every day.
4. Always be sure to play music every day.
5. Play these with the music and by memory.
6. For the lip slurs use the sequence of fingers- 0, 2, 1, 12, 23, 13, 123 .
. .
7. Don’t be hung up about lip pressure, but always use less, rather than
more.
8. Keep the embouchure as stable as possible at all times.
9. Take a full, slow, breath – in rhythm before playing.
10. In the sequence of studies staring at (measure 148), use the fingering pattern
(0, 2, 1, 12, 23, 13, 123.)
Starting the buzz

The two most important physical elements in brass playing is the use
of air and the vibration of the lips.
When starting to play it is very important to find the right balance
between “air and vibration”.
While holding the mouthpiece gently between the thumb and the index finger,
blow a steady stream of air through it. Keep blowing with a relaxed open aperture
until the air stream is very steady (= with the same air velocity).
Bring the index finger of the other hand below the open shank. Gradually roll
the finger over the open hole. When the hole is covered one-half to two-third
(see the picture), a buzz will start to sound.
Exercises:
1. Repeat the above several times and try to change the air speed. With faster
speed, you should get a buzz sound with a higher pitch.
2. Place the mouthpiece in the trumpet and while blowing a low C, gently remove
the mouthpiece while you keep blowing. The sound will stop, but keep blowing.
Listen to the sound of the air and try to “remember” the air velocity.
Take a short rest and start blowing with the air speed you had when you played
the low C. Use your index finger to initiate the buzz again. Did you get a buzz
with the same low C pitch?
Repeat this several times.
Try a G above low C. Repeat several times.
Combine low C and middle G – see if you can “remember” the difference
in air velocity.
3. Try other combinations of intervals (octave, fourth, scale steps, etc.)
NOTE:
Use the finger only as a “trigger” for starting the buzz – remove
it when the buzz sound starts.
Don’t rush into buzzing – work on the quality of the air first. (A mental image:
water from a tap)
A good steady airstream will result in a good buzz sound.
A good buzz again, will result in a better sound on the trumpet.
The suggested exercises are just simple ideas – be creative and invent others
– but remember, this is mainly a “tool” for finding the balance between
“air and vibration”.
Warmup exercise
This warmup is based on 3 different routines. The pattern is from Vincent Cichowicz,
the bending from James Stamp and the pedal fingering from Harold Branch. Comments:
Play legato. Bend the first note down with lips only (same open fingering on
the B). When going from A down to pedal F use same fingering (1-2) on the pedal
note. At first try to use a kind of glissando from A to F to maintain the same
embouchure on the pedal note. Play the last note strong. Waist all air.
Also try to “lock” each note into the center of its “harmonic
slot”.

Continue the pattern up to f2, adding one note at a time:

Then start pattern from g1 (also now bending down a semitone to f-sharp). When
reaching high C (c3), start pattern from c2.
Midi-file of the whole exercise
in a ZIP’ed version, to download.
The Stevens Isometric Exercises
The following are exercises to strengthen the embouchure muscles. The positions
are exercise positions, not playing formations. Use a small hand mirror during
exercises at all times.

AIR TO NOSE EXERCISE
1. Roll lips in enough to hug teeth edges.
2. Bring jaw forward as far as necessary to blow air to tip of nose. Air must
flow freely in one steady column.
3. Keep repeating until jaw aches.
AIR TO CHIN EXERCISE
1. Recede jaw, pull bottom lip up hard.
2. Blow air with great force using abdominal muscles,
3. Keep repeating until cheeks ache.
Top lip and teeth must overlap bottom lip and teeth.
NORMAL TO FROWN EXERCISE
1. Line lips up parallel to each other.
2. Bring red meat in, enough to hide red meat of both lips.
3. Bring jaw forward slightly.
4. Begin bearing down hard with top lip. At the same time bring bottom lip up
hard. Squeeze hard for 5 seconds, then relax completely.
5. Keep repeating process till cheek muscles ache.
Check Points:
1. Mouth corners down.
2. Red meat hidden.
3. Bottom lip resembles cushion
Original site : O.J’s Trumpet Page

Short URL: https://trendmarching.or.id/read/?p=658
