Part 1 : The Youngster’s Guide to Multi-Tenor Drum Technique
Intended for use by Newark High School Drumline Members
Table of Contents
Introduction
About the Drums.
The Complete Setup.
I. The Look.
II. The Grip.
III. The Set Position.
IV. Playing Position.
The Playing of the Drum.
I. Playing Zones.
II. Stroke Guidelines.
III. Types of Strokes.
IV. The Axes of Power.
V. Applying the Axes to your stroke.
Introduction
The fine art of playing multi-tenor drums, or tenors, is a joy that cannot
easily be surpassed by anything known to man. This joy comes as the fruition
of lots of practice, determination, coordination, a little back pain, and, here
is the real key, good technique.

The contents of this packet will help students gain a thorough understanding
of the mechanics behind tenor drumming, along with how to apply them to play
fun challenging parts aggressively and musically.
In order to get the most benefit out of tenor instruction, it would be wise
to read through this packet in its entirety and continually refer back to in
when practicing. Doing so will intensify your understanding of the subject material
and aid in preventing bad habits from forming.
About the Drums
Though marching toms have been around for a long time, they were not seen in
their modern form until fairly recently. It is said that modern tenors were
first introduced to the marching field in the 1980s by a senior drum corps,
called the Caballeros. This group is known for performing Latin and Spanish
shows and therefore has members march across the field, along with the snare,
field tom, and bass drummers, with timbales, congas, and bongos strapped to
them. Over the years, the timbales and bongos were altered in size and design
to allow one person to carry them as well as to improve the projection of sound
to the audience. Gradually the size of the drums got smaller so more could be
carried at one time.
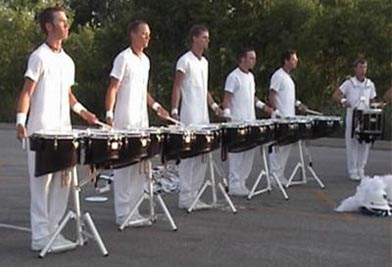
Tenorlines
in most colleges and drum corps use tenors with five to six drums, called quints
or sexes, with drum sizes of 6, 8, 10, 12, 13, and 14 inches in diameter. For
the beginner high school tenorline, it is best to stick with four or five drums
so as not to be overwhelming to the student. Most high school marching programs
stick with a smaller set of quads (8, 10, 12, 13 inches), but I prefer the sound
of a large 14 bottom drum.
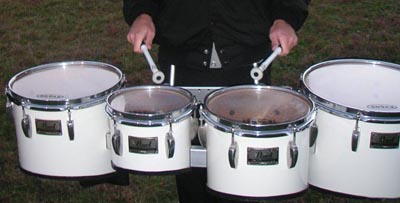
When referring to the different drums, the 8 inch drum is called “one”,
the 10 inch: “two”, 12 inch: “three” and the 14 inch
is, of course, “four”. They are positioned with the one and two
drums centered and farther away from the body, with the one drum on the right
side. The three drum is closer the right forearm and the four drum close to
the left forearm.
Tenors are carried on a padded metal harness, or carrier. When carried correctly,
the playing surface of the drums should run perfectly parallel to the ground
in all directions. Depending on the high and size of the player, the top of
the drums should fall roughly at their hips to allow for a comfortable playing
angle. Since the drums fit much lower than snare drums or bass drums and they
are also heavier, the tenors will place the most strain on the players’
lower back. It is for this reason that it is important to stretch before using
the tenors, at least at first, and to exercise the back to prepare for the long
days of band camp.
*IMPORTANT SAFETY TIP* Never lean back when carrying a drum, this only further
tightens your tired muscles, and can lead to subsequent back pain in the future.
Instead, keep your legs straight and lean forward to let your drums touch the
ground.
The Complete Setup
In order for each member of the tenorline to sound the same, they must first
look the same. Your posture and overall form is every bit as important as how
well you can actually play.
I. The Look – always use this when your drum is on
1. Stand up straight – this will make keep the drums level and ease the strain
on your back
2. Feet together – heels and toes should be touching
3. Keep your knees back – support your weight all the way down to your
heels without locking your knees
4. Pull your shoulders back slightly – keep from slouching
5. Keep your lower back straight – bending it shifts the weight and will
hurt you
6. Project your body upwards – fill the carrier with shoulders and chest,
be tall
7. Keep your head up, staring straight ahead
8. Never speak unless asked for your input or you have a question
9. Confidence is key – always present yourself with a professional look
of concentration and intensity; look like you’ve been playing all your
life and it will show through in the music
*REMEMBER* whenever you are wearing a drum, uniform, or even drumline clothing,
you are representing everyone that was a member before you, along with those
that teach you. Make each of them proud by presenting yourself well so they
will want to come back.
II. The Grip – never let this change… and I mean never
1. Place the mallet into your hands so the end of the rubber part is flush with
the back of your palm so the butt is resting at the skin fold near your pinky
2. Fulcrum – Pinch between pad of thumb and first joint of index finger, this
is the pivot point
3. Close space between index and thumb
4. Loosely wrap other three fingers around mallet – these are just support
5. Wrist and Forearm form one straight downward angled line
6. Palms are down but slightly angled inwards so thumbnail can be seen –
this adjusts for the lower position of the drum
7. Keep your elbows where they fall naturally – not pulled in or out
8. RELAX – everything from your shoulder down to your hand
*Please Note* the more difficult a passage is, the more important it is to
follow these grip guidelines. If you let your fulcrum go during a roll, you
will lose control and it will sound dirty.
III. The Set Position – When the drumline captain or an instructor
says “set” follow these instructions

1. Start with your arms at your sides with one mallet gripped in each hand
2. Bend at the elbow and move your forearms in towards your stomach so both mallets
sit parallel to each other with your right mallet farther forward than the left.
3. While holding the mallets with the other fingers, straighten your left pinky,
ring, and middle fingers and your right thumb.
4. Bring the Mallets closer together so your left index finger is all that is
between them
5. Close your left pinky, ring, and middle fingers around the right mallet and
place your thumb on the back of the left mallet.
6. The mallets should still be parallel
7. Rest your hands 1 inch about the playing level and 3 inches away from your
body
IV. The Playing Position
When an exercise, cadence, or musical passage is about to start, tenor players
go from the set position to the playing position on beat 3 of the measure prior
to the first note to be played. The playing position as follows:
1. Right mallet to drum one, Left hand to drum two
2. Nylon tip of mallets ½ inch above drum head, 2 inches away from rim
at the point closest to the body
On count four of the measure prior to the first note, both mallets will move
to where the first note on each hand will be played. Instead of mallets coming
out in one count, like the snares and basses, sticks out is a two count move.
*NOTE* when moving between set and playing positions, the motion should be:
1. Smooth – one fluid motion
2. Quick – think of being there, not getting there
3. Silent – don’t hit the rim, drum, or mallets together
Jeffrey Cramer, With Input from James P. Ancona, Bill Bachman, and Michael Windish
Artikel bersambung ke artikel Part 2 : The Playing of the Drum – now to the fun stuff.

Short URL: https://trendmarching.or.id/read/?p=791
