An Introduction to the Timpani
The Following Lesson is Excerpted from

An Introduction to the Timpani
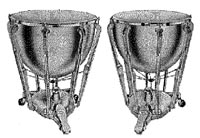
The word “timpani” is taken from the latin word “timpanum,” meaning “vibrating membrane.” The timpani’s heads, which used to be made primarily of calf skin, when struck, are made to vibrate. The timpani are often called kettle drums because the bowls, which are made from copper, resemble kettles. Timpano is singular, timpani is plural (so PLEASE don’t refer to them as the “timpanies!”). Timpani range in size from 32 inches to 23 in ches (the standard sizes are 32”, 29”, 26‘’, and 23” – 3 inches for each separate size). Each drum has a melodic range of about a 5th (see intervals on Lesson 17). The music for timpani is written in the BASS CLEF.
The Proper Beating Spot

The proper beating spot on the timpani is approximately one-third the distance between the rim and the center of the head (about 4 inches from the rim). Since the timpano is a bowl, you NEVER strike it in the center as you do other types of percussion instruments. Because the bowl acts as a reson ating chamber, the sound vibrations have nowhere to travel when you hit the drum in the center (actually, if you’d like to test it out, go ahead: hit the drum in the
center. You should find that the head doesn’t vibrate at all. If the head doesn’t vibrate, we wouldn’t call them “timpani” would we?).
Getting a Great Hand Position
Grasp the timpani mallet just as you do a keyboard mallet. Instead of playing with “flat” hands, turn your wrists to where the thumb nail is facing the ceiling (this is known as the “French Style” of playing). Relax the back fingers – they should lightly make contact with the shaft of the mallet. For a darker, heavier tone, add more finger contact by squeezing the stick slightly.
The Stroke Style
You should strike the timpani in the same place on the head on every stroke.
By playing in a few different spots on the drum, you can tell that a variety of tones can be produced (from a very thin soun d n ear the rim to a dead sound when struck too close to the center).
The “Prep Stroke”
- Start with the stick about 3 inches from the head (with the “French”hand position)
- Raise the forearm slightly while leaving the mallet head in the same position (causing the wrist to turn).
- As you continue to raise the forearm, allow the wrist to “react” to the motion.
The “Stroke”
- Allow the weight of the forearm to carry the stick back to the timpani head.
Again, the wrist (which is totally relaxed) should react to the movement of the arm – much like the way a baby’s head would react when he or she is picked up suddenly by a mother.
The “Follow Through”
- At the exact moment of impact of the mallet with the drum head, snap the
wrist slightly – the way you would “pop” someone with a wet towel
(but only SLIGHTLY). - Allow the hand to come up to shoulder level, then gen tly bring the stick back to playing position.
- This is the most important part of the stroke because it “draws” the sound out of the in strument – just like a batter needs a full follow through to be able to hit a baseball out of the park.
Practice the Stroke
Before we begin , I would like to poin t out how importan t your “frame of mind” is when playing the timpani. Most highly trained, professional percussionists agree that the job of playing the timpani is the most important in the symphonic percussion section. Every major symphony orchestra in the world has a “timpanist” that is a specialist and is separate from the rest of the percussion section . To become a successful timpanist, you must approach the drums with an “atti- tude of sophistication.”
Don’t worry about tuning the drums yet – have your instructor tune these pitches for you. Each “prep stroke” in this exercise should begin one count before the note, and the “follow through” should last approximately one-half of the note’s duration (2 counts on whole notes, 1 count on half notes). M emorize this line so that you can watch your
hands and the mallet placement on the timpan i head.
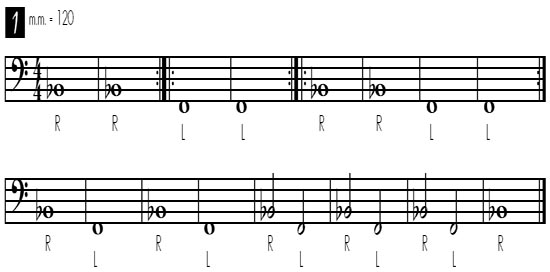
As you make the left stroke on the high drum (the drum on the right) in this next exercise, you must rotate your upper body at the waist so that your hands are centered on the drum. The same goes for the right stroke on the low drum.
Remember your prep stroke and follow through in the first four measures. As you play the quarter n otes in measure 5, you will not be able to make a follow through on every note: save the follow through for the half note at the end of the phrase. Try to make the prep stroke feel natural and relaxed.

Use the suggested sticking and alternate every stroke. Remember to follow through on each half note!

Passing Strokes
It is often necessary for the sticks to pass from one drum to another without the luxury of having a half note or rest to give you time for a smooth transition.
To produce the best possible sound on each drum, it is necessary to eliminate as many “cross stickings” as possible. Consider this example:
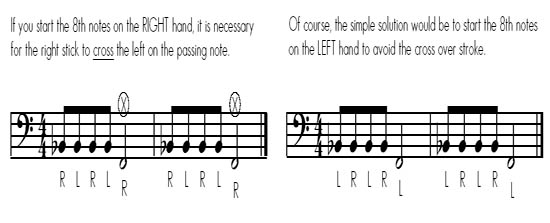
To develop the proper sticking for passing strokes, you must first decide if the group of notes directly before the pass- ing stroke is “EVEN” or “ODD.” Odd groups of notes should start with the outside mallet (the mallet that’s the greatest distance from the drum that you are passing to). Even groups of notes should start with the inside mallet. Proper sticking habits must be “second n ature” to a timpanist! Work on these exercises for a few weeks with a metro- nome set on 120.

Artikel bersambung : Tunning the Timpani.
Copyright © 1996 by Mark Wessels Publications
Mark Wessels Publications • 433 Derby Lane • DeSoto, TX 75115

Short URL: https://trendmarching.or.id/read/?p=803
